Alexander Calder (July 22, 1898 – November 11, 1976) was an American sculptor and artist most famous for inventing mobile sculptures. In addition to mobile and stable sculpture, Alexander Calder also created paintings, lithographs, toys, tapestry, jewelry and household objects.
Wednesday, February 29, 2012
Tuesday, February 7, 2012
Field Trip to LACMA - Los Angeles County Museum of Art
Walking through the Jesus Rafael Soto exhibit. Interacting with this sculpture
caused your sense to feel as if you were in tubes of rain that you could move around.
Here is one of the most important reasons why students write about their art that
they choose to have in the art museum. Label copy is how the artist can tell a little
story about how, when and why the work was made.
Standing under Tony Smith's "Smoke". The sculpture completely encompasses the large room of the Ahmanson Building.
The LACMA trip also gives students a chance to practice their art skills. Sketching the work in the museum is important to help connect what is being done in the class with
the important art from our history.
Kindergarten's Response to Piet Mondrian's - Broadway Boogie Painting
Piet Mondrian - Broadway Boogie
The conventional or easy way to teach Mondrian's use of color in this classic painting would be to give students only the primary colors, black and white to use and ask them to create perfect geometric shapes. In this lesson I spoke with the students about what a city is like, how it sounds and how, especially in New York City, things are constantly moving. I wanted the students to use what ever colors they felt a connection with then to use the energy you would find in the city to come out in their drawings. You can see how each student blended their oil pastels differently and strongly.
5th Grade Acrylic Painting Techniques
In this lesson I am teaching the 5th graders various acrylic painting techniques. We initially started with a base background color using long brush strokes, which showed students how to blend paint together. The students then loaded some of their paint with a generous amount of water, applied the wet paint to their canvas and let the watered down paint drip down or across the canvas. Some students stuck with creating a few drips, while others relished in the chance to give the paint a life of its own. A few students even substituted dripping paint with dripping water creating the effects of a reverse painting method.
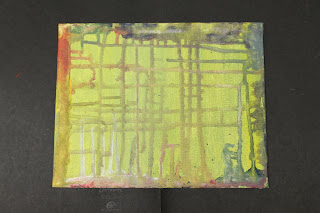
Step two will incorporate an illustrative painting over the background colors you see here.
Subscribe to:
Posts (Atom)